When your vehicle fails to start despite turning the key, the culprit is often a faulty starter solenoid that requires immediate attention. Learning how to repair solenoid starter motor components at home can save you significant time and money compared to professional garage services. This comprehensive guide will walk you through the essential steps to diagnose, repair, and maintain your starter solenoid system using common tools and replacement parts.
The starter solenoid serves as an electromagnetic switch that controls the flow of electrical current from your battery to the starter motor. When this component malfunctions, it disrupts the entire starting sequence, leaving your vehicle immobilized. Understanding the basic principles behind solenoid operation will help you identify problems quickly and execute effective repairs. Most solenoid failures stem from worn contact points, corroded terminals, or internal winding damage that can be addressed through systematic troubleshooting.
Understanding Starter Solenoid Components and Function
Internal Structure and Operating Mechanism
The starter solenoid contains several critical components that work together to engage the starter motor. The electromagnetic coil creates a magnetic field when energized, pulling the plunger assembly toward the contact points. This mechanical action simultaneously engages the starter drive gear with the flywheel and closes the high-current circuit between the battery and starter motor. When you repair solenoid starter motor systems, understanding this dual function is essential for accurate diagnosis.
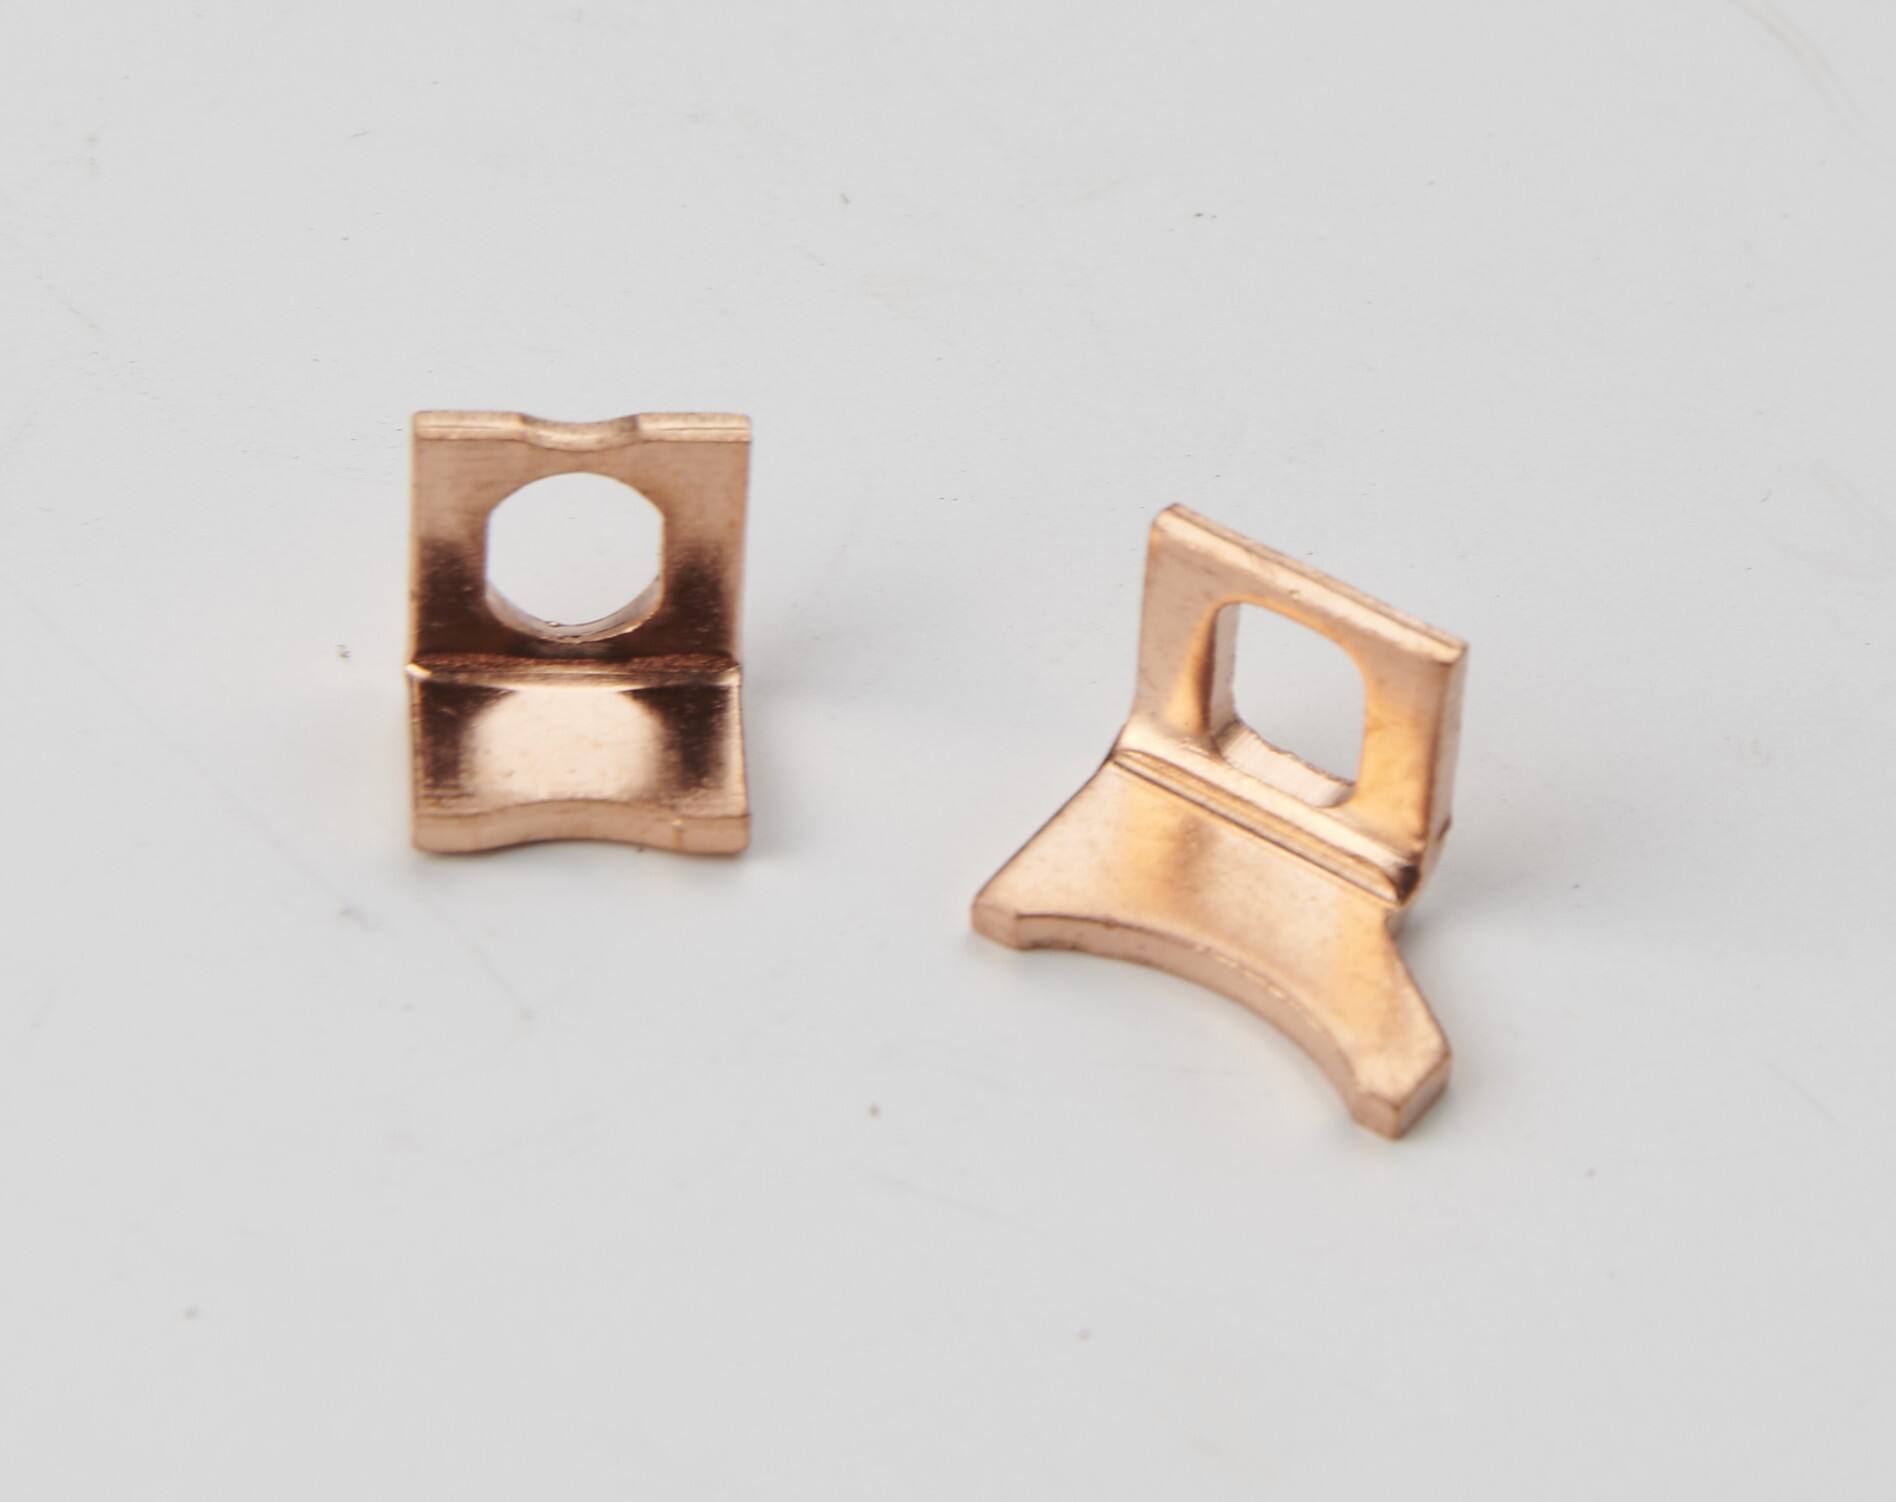
The contact disc assembly represents the most vulnerable part of the solenoid mechanism. Heavy electrical loads and repeated cycling cause these copper contacts to wear down over time, creating resistance and heat buildup. The plunger return spring maintains proper contact pressure and ensures reliable disengagement when the ignition key is released. These components must work in perfect harmony to deliver consistent starting performance.
Common Failure Modes and Symptoms
Identifying the specific failure mode helps determine whether you need to repair solenoid starter motor components or replace the entire unit. A clicking sound without starter engagement typically indicates worn contact points or insufficient electrical connection. Complete silence when turning the key suggests total solenoid failure or power supply issues. Intermittent starting problems often point to loose connections or partially damaged internal components that require immediate attention.
Voltage drop testing reveals the condition of internal contacts and wiring connections. A healthy solenoid should show minimal voltage loss across its terminals during operation. Excessive voltage drop indicates internal resistance problems that compromise starting performance and battery life. These diagnostic techniques help you determine the most appropriate repair strategy for your specific situation.
Essential Tools and Safety Preparations
Required Tools and Equipment
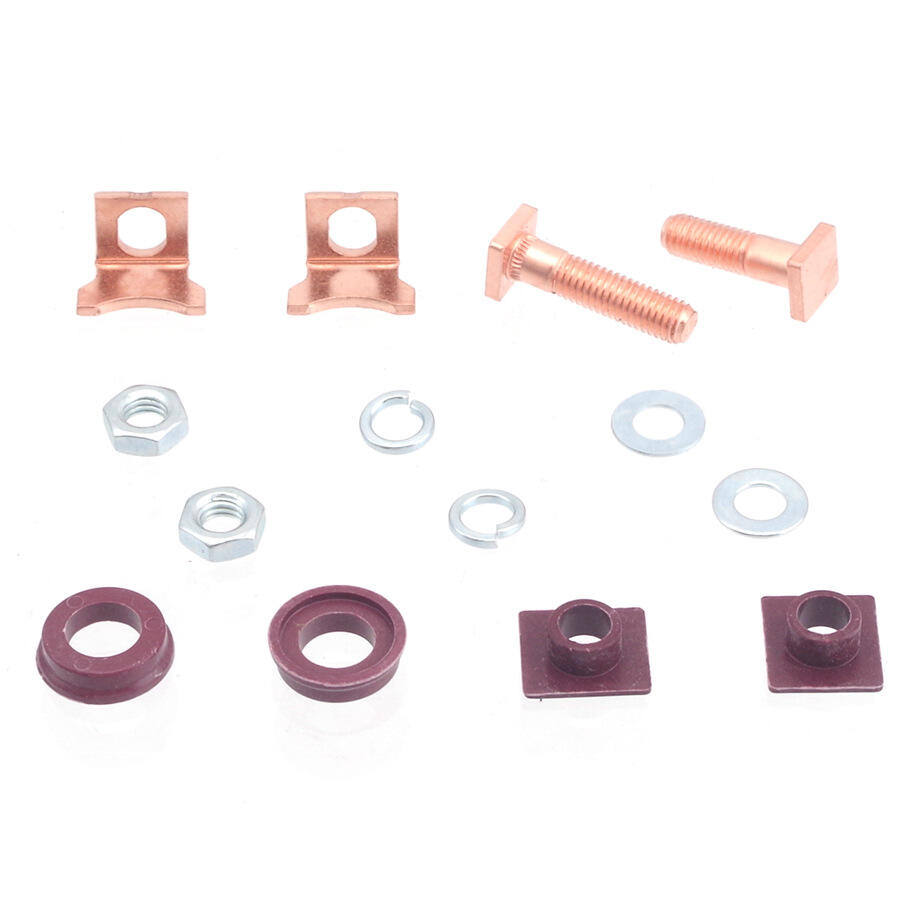
Successful solenoid repair requires specific tools designed for automotive electrical work. A digital multimeter with current measurement capability is essential for testing voltage, resistance, and continuity throughout the system. Insulated hand tools prevent accidental short circuits while working around live electrical components. Socket sets, wrenches, and screwdrivers in various sizes accommodate different solenoid mounting configurations and terminal arrangements.
Specialized tools like battery terminal cleaners and contact burnishing files help restore proper electrical connections during the repair process. Heat shrink tubing and electrical tape provide durable insulation for repaired wire connections. A bench vise or secure work surface enables safe disassembly and component inspection. Quality replacement parts ensure reliable long-term performance after completing your repair solenoid starter motor project.
Safety Protocols and Workspace Setup
Working with automotive electrical systems requires strict adherence to safety protocols to prevent injury and component damage. Always disconnect the negative battery terminal before beginning any electrical repair work. This simple step eliminates the risk of short circuits and accidental starter engagement during the repair process. Wear safety glasses and insulated gloves to protect against sparks and electrical shock.
Establish a clean, well-lit workspace away from flammable materials and fuel sources. Organize your tools and replacement parts before starting the repair to maintain efficiency and prevent lost components. Keep a fire extinguisher nearby when working with electrical systems, as short circuits can generate significant heat and sparks. Proper preparation reduces repair time and ensures professional-quality results.
Step-by-Step Solenoid Repair Process
Initial Diagnosis and Testing
Begin the repair process by conducting comprehensive electrical tests to confirm solenoid failure and identify the root cause. Measure battery voltage to ensure adequate power supply, as weak batteries can mimic solenoid problems. Test the small control wire from the ignition switch for proper voltage during key activation. This systematic approach helps you repair solenoid starter motor issues efficiently without unnecessary component replacement.
Perform a load test by bypassing the solenoid control circuit and applying battery voltage directly to the solenoid terminals. A functioning solenoid should produce an audible click and engage the starter motor immediately. No response indicates internal mechanical failure, while weak engagement suggests worn contacts or reduced magnetic strength. Document your test results to guide the repair strategy and parts selection process.
Disassembly and Component Inspection
Carefully remove the solenoid from its mounting location, noting the position and connection of each wire terminal. Most solenoids attach with two or three bolts and slide out once the electrical connections are disconnected. Mark wire positions with masking tape to ensure correct reassembly after completing the repair work. Take digital photos of the original configuration for reference during the installation process.
Disassemble the solenoid housing using appropriate tools to access internal components without damage. Inspect the contact disc for burning, pitting, or excessive wear that affects electrical conductivity. Examine the plunger assembly for smooth operation and proper alignment within the coil housing. Check all internal springs for proper tension and evidence of fatigue or corrosion that could compromise performance when you repair solenoid starter motor systems.
Contact Point Restoration and Replacement
Contact Surface Preparation
Restoring worn contact surfaces requires careful attention to surface finish and dimensional accuracy. Use fine-grit sandpaper or a contact file to remove oxidation and minor pitting from copper contact surfaces. Work in a circular motion to maintain uniform surface texture and avoid creating grooves that could cause arcing. Clean all filing debris thoroughly to prevent contamination of other solenoid components during reassembly.
For severely damaged contacts, complete replacement provides better long-term reliability than surface restoration. Quality repair solenoid starter motor kits include precision-manufactured contact discs that restore original performance specifications. Ensure proper contact alignment and spring tension during installation to prevent premature wear and maintain reliable electrical connection under high-current conditions.
Assembly and Adjustment Procedures
Proper assembly sequence ensures optimal solenoid performance and longevity after repair completion. Install the plunger assembly first, verifying smooth movement throughout its full travel range. Apply light lubrication to moving parts using appropriate electrical contact grease that won't attract dirt or interfere with electrical connections. Check spring tension and adjust as necessary to maintain proper contact pressure.
Torque all fasteners to manufacturer specifications during final assembly to prevent loose connections and mechanical failure. Test the completed assembly using a bench power supply before installation to verify proper operation. This quality control step identifies potential problems while the solenoid remains easily accessible for additional adjustments or component replacement.
Installation and Performance Testing
Proper Installation Techniques
Install the repaired solenoid using the reverse sequence of the removal procedure, ensuring all electrical connections match the original configuration. Apply dielectric grease to terminal connections to prevent corrosion and maintain reliable electrical contact in harsh operating environments. Tighten all mounting hardware securely while avoiding over-torque that could damage the solenoid housing or mounting brackets.
Route wiring harnesses away from hot engine components and sharp edges that could cause insulation damage over time. Secure loose wires with appropriate clips or ties to prevent vibration-induced fatigue and connection problems. Double-check all connections before reconnecting the battery to ensure proper polarity and circuit integrity throughout the starting system.
Functional Testing and Validation
Conduct comprehensive testing to verify successful repair and proper system integration after installation completion. Begin with static voltage tests to confirm proper electrical connections and circuit continuity. Measure voltage drop across solenoid terminals during operation to verify low internal resistance and efficient power transfer to the starter motor.
Perform multiple start cycles to test reliability under normal operating conditions and confirm consistent performance. Monitor solenoid temperature during extended testing to identify potential problems with internal resistance or inadequate cooling. Document test results and compare them to baseline measurements to validate the effectiveness of your repair solenoid starter motor efforts and ensure long-term reliability.
Maintenance and Troubleshooting Tips
Preventive Maintenance Strategies
Regular maintenance extends solenoid life and reduces the frequency of major repairs through proactive component care. Clean battery terminals and cable connections monthly to prevent voltage drop and reduce stress on solenoid contacts. Inspect mounting hardware for looseness or corrosion that could affect electrical connections or mechanical stability during operation.
Monitor starting system performance for early signs of solenoid degradation, such as delayed engagement or inconsistent operation. Address minor problems immediately to prevent cascade failures that require extensive repair work. Keep detailed maintenance records to track component performance and identify patterns that suggest systematic issues requiring attention when you repair solenoid starter motor components.
Advanced Diagnostic Techniques
Sophisticated diagnostic methods help identify intermittent problems and marginal components before complete failure occurs. Oscilloscope analysis reveals voltage and current waveforms that indicate internal solenoid condition and electrical system health. Temperature measurement during operation identifies hot spots that suggest excessive resistance or inadequate cooling in critical components.
Current signature analysis compares operational characteristics to known good patterns, enabling precise fault isolation and targeted repair strategies. These advanced techniques become valuable when dealing with complex electrical problems or high-value equipment where downtime costs justify sophisticated diagnostic equipment investment. Professional-grade tools enhance your ability to repair solenoid starter motor systems efficiently and accurately.
FAQ
How long does a typical solenoid repair take to complete
Most solenoid repairs can be completed within 30 to 60 minutes, depending on the extent of damage and your experience level. Simple contact cleaning and adjustment typically requires 20-30 minutes, while complete disassembly and part replacement may take up to 90 minutes. Having the right tools and replacement parts ready before starting significantly reduces repair time and ensures efficient completion.
What are the most common signs that indicate solenoid failure
The most obvious symptom is a clicking sound when turning the ignition key without starter motor engagement. Other indicators include complete silence during start attempts, intermittent starting problems, or starter motor running without engaging the flywheel. Voltage testing typically reveals excessive voltage drop across solenoid terminals during operation, confirming the need to repair solenoid starter motor components.
Can I repair a solenoid multiple times or should I replace it
Quality solenoids can be repaired multiple times if the housing and coil remain in good condition. However, extensive contact wear, coil damage, or housing cracks typically indicate that replacement is more cost-effective than repeated repairs. Consider the age and overall condition of your starting system when deciding between repair and replacement options for long-term reliability.
What safety precautions should I take when working on starter solenoids
Always disconnect the battery before beginning any electrical repair work to prevent accidental short circuits or starter engagement. Wear safety glasses and insulated gloves to protect against sparks and electrical shock. Work in a well-ventilated area away from fuel sources, and keep a fire extinguisher nearby when working with automotive electrical systems that can generate heat and sparks during operation.